Welcome

Welcome to my blog where I post regular photographs of cards I have made. I hope you enjoy looking through my cards and I would like to thank you for taking the time to stop by and also for leaving any comments and following my blog. I shall also be posting a few of my knitting projects too.

Followers

Monday 29 April 2013

Checking FB


Hi fellow crafters and followers.  Hope you are all well today?

Well today's post is a digi stamp from Mo's Digital Pencil called Checking FB.  To be honest she resembles me at this very moment.  I am sitting in my Jimmy Jammies preparing this post and checking out facebook etc.  Mind you it is 9.30pm so I think it will be okay.

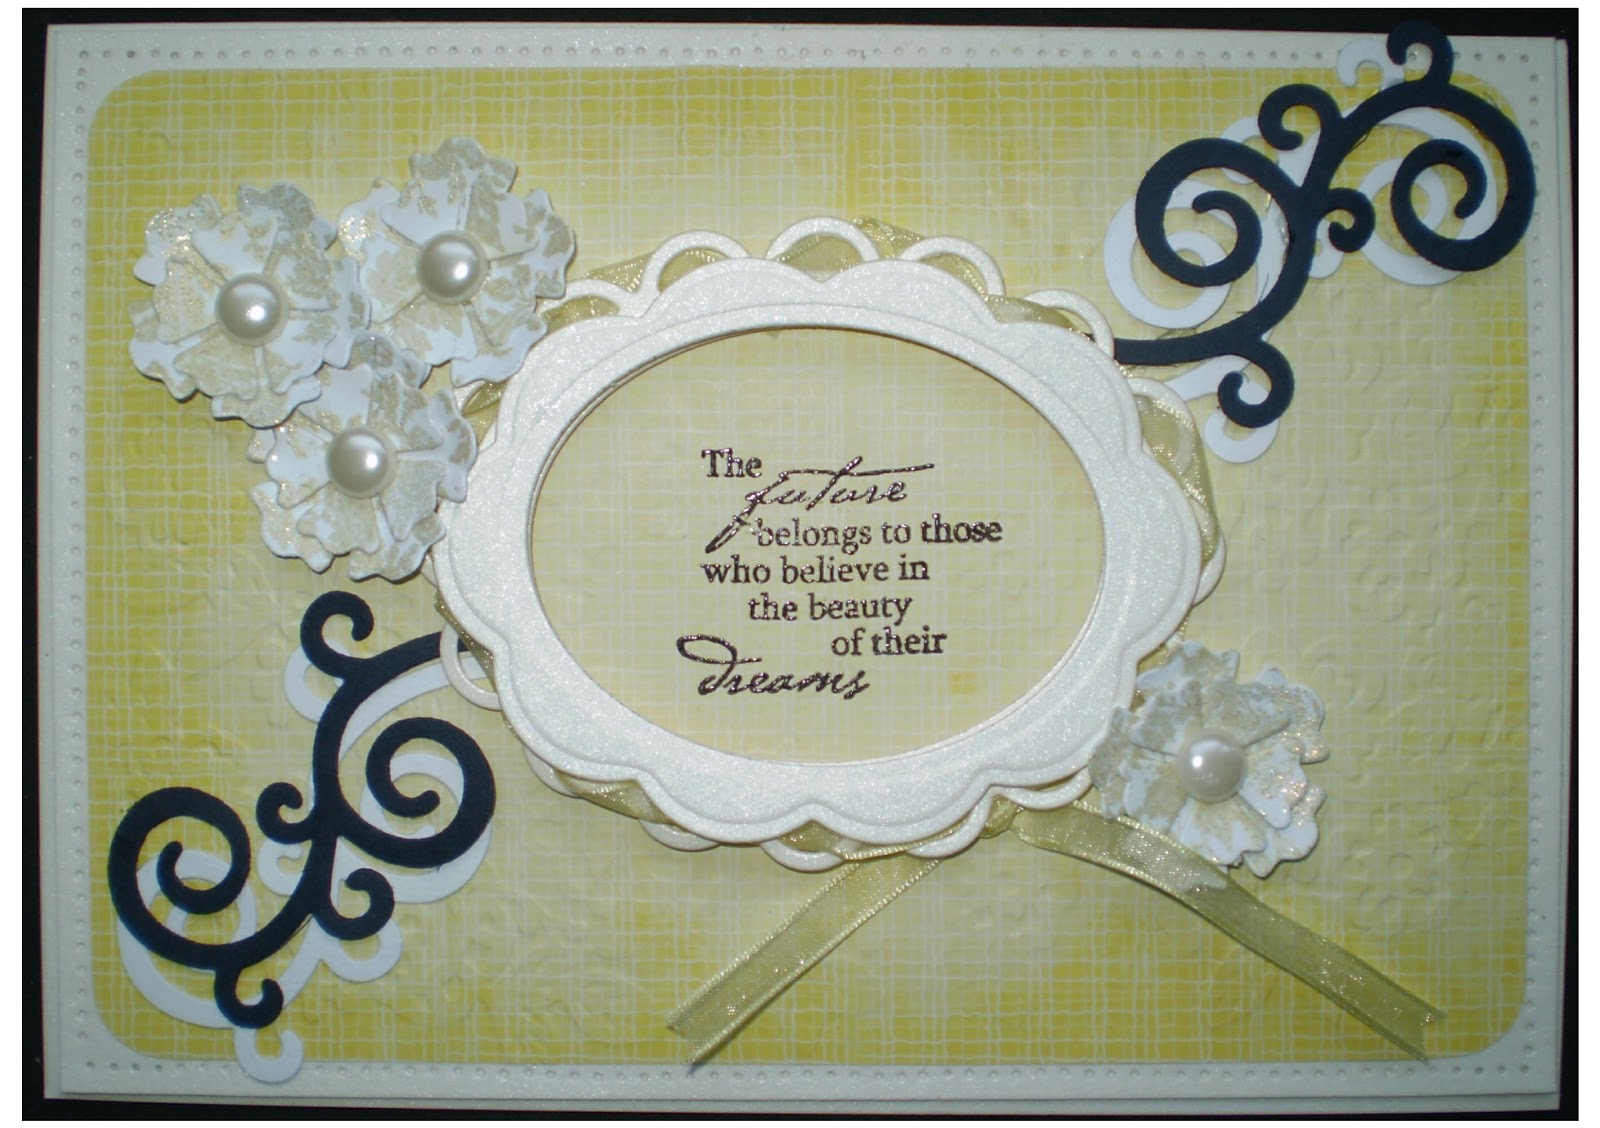
Madam here was coloured in using copics.  I always colour first and then make my card up.   Gives me a good idea on colour combos then, all I have to decide is layout.
 
 I began with an 8x8 plain white card, matted some brown pearlescent card on and then embossed some plain white card using an A4 m bossibilities folder.  Before putting it in the embossing folder I inked up the folder with spiced marmalade distress ink and then ran it through my grand caliber.

I die cut my image out with a square die cut from XCut but prior to that I cut up to her bottom and just below her knee.  I then die cut her by putting the die cut below the bit I have cut.  That was how I achieved her sitting on the end of the square - I do hope I have explained that okay.  I matted her onto some brown pearlescent card die cut using a spellbinders grande scalloped square.  Another piece of brown pearlescent card and finishing off with two sentiments using Xcut labels.   Finally some card candi as an accent.

Hope you enjoyed taking a peek at her.  Thanks for stopping by I do appreciate it.  Take care.

I have entered this card into the following challenges: -

Saturday 27 April 2013

'Oops Nearly Dropped 'Em'


Good evening crafters and followers. Gosh what a Saturday it has been, we have had hail, rain and sunshine - can't you just tell we live in England!

My post today in using a Mo Manning digi stamp - Big Girls Pants.  One I have used before and posted on this blog but again she is such a sweetie and so lovely to colour in.

 
I coloured her in using my copic ciao pens: -

Skin = E0000; E00;
Hair = E33; E35; E37
Pants = G02; G05; G07;
Top= YG00; YG03; YG06
 
I die cut her out using the outside ring of the Spellbinders A2 Floral Ribbon Threader set and inked around the edges with antique linen distress inks.
 
I then started with an 8x8 plain white square card, embossed and sanded down some green co-ordinations card, die cut two pieces of parchment circles using a Marianne die and die cut some plain white flowers using some Xcut daisy dies which I inked up with squeezed lemonade distress inks.  I finished the flowers off with some pearl gems and also added some pearl gems as an accent in the corner.

I  hope you enjoy this post as much as I enjoyed colouring her in.  Thank you for stopping by.  Take care.
 
I have entered this card into the following challenges: -


Tuesday 23 April 2013

Boobie Love in April

 
Good evening crafters and followers.  Hasn't it been a beautiful day?  In Birmingham we have had wall to wall sunshine, ofcourse I don't suppose it will last, according to the weather forecast I have just watched it will go down hill now with rain coming on Friday and Saturday still we must make the most of it while we have it.  Beautiful weather to have on St George's Day.
 
Well Tuesday is my day off and I was crafting this afternoon.  I had coloured some digi stamps in whilst watching the TV on Sunday.  My image today was one of those.  Miss Boobie Love from Saturated Canary.  I have used this image at least three times on my blog but I do soooooooooooooo love the image.  My apologies if you are getting fed up of it but It will appear again I can promise you.
 
Having got my image I decided to check out Feline Playful to see what challenges started and look for a sketch.  Once I found that I was away.
 
So my card, I started with an 8x8 plain white card followed by a piece of grey card followed by my patterned card which was in my crafty stash.  I embossed my striped card with an 8x8 embossing folder from Crafters Companion which hopefully you can just about see.
 
I then cut out three squares of grey card using a punch I bought years ago followed by three pieces of striped card with a smaller punch from the same set.  I then die cut my image using Nestibilities Ovals and matted that onto some of the grey card die cut from Nestibilities Scalloped Ovals.  My image has been coloured in with Copics. 
 
 
My flowers and flourishes are all die cut from Spellbinders Flowers & Flourishes set.  For the flowers I used plain white card and stencilled using Weathered Wood distress ink.  Topping off with some card candy.
 
I really enjoyed myself this afternoon and completed lost track of time, as you do when crafting and ofcourse chatting to my crafty chums, Kathy and Sheila on Skype.
 
Hope you like this card as much as I enjoyed making it.  Thanks for stopping by and do take care.
 
I have entered this card into the following challenges:


Monday 22 April 2013

Garden Weave

Hi crafters and followers.  Good evening to you all and I hope you have had a good weekend.  Sadly it comes to an end far too soon doesn't it?

My card today is another simple card but it uses spellbinders d-lites that I hadn't used before despite having had them for a couple of months.

I started with a base white C5 cards followed by a piece of maroon card and finally a piece of white pearlscent card which I embossed using one of the 8x8 embossing folders from Crafters Companion.

I then cute 4 lots of the d-lites as you can see.  I finished it off with a sentiment.

Like I said a very simple card which didn't take very long to make but I do hope you like it.

Thanks for stopping by.  Take care.

Saturday 20 April 2013

Pink Florals

Hello crafters and followers.  Hope you are having a good day.

My card today is me playing with my roses.  I started with a white C5 base card followed by a piece of brown pearlescent card.  I then matted some pink paper on which was from my crafty stash, a freebie from an old Making Cards magazine.  I did distress around the edges with vintage photo distress inks.

I stamped my image with pink pearlescent ink.  The image is from chocolate baroque and came as an A5 plate with a butterfly stamp too.  I die cut my image using my spellbinders and stencilled a little with vintage photo distress ink.  I layered this onto another piece of brown pearlescent card die cut from a spellbinders die.  The ribbon is thread through a diecut from marianne and finished off with pink flower gems.  My flowers are made using some brown paper and I used the petal flowers from dimensions to make the roses.  I finished my roses off by spraying them with pink glitter spray from crafters companion.

Hope you like the card.  Thanks for taking a peek and you take care.

I have entered this card into the following challenges: -

Thursday 18 April 2013

Krafty Kate


Hi crafters and followers.  Hope you are having a good day.
 
My card today was made specifically for a challenge.  Basically my mojo was on a go slow and you know when you are sitting in your craft room or chair and trying to decide what do?  Well that was me today.  So I decided to have a look at some challenges on Feline Playful and found one with a sketch I quite liked and decided to follow that.
 
So I had already printed out my digi stamp which is Krafty Kate from Saturated Canary.  I have coloured her in with copics.

I was originally going to use a C5 card but when I started layering I decided it really needed a bigger card so my base card is an 8x8 plain white card followed by a piece of lilac card followed by a piece of white card which I embossed with one of the new 8x8 embossing folders from Crafters Companion.
 
I then found a piece of patterned lemon paper out of my crafty stash and die cut that using a lacy doily type die which I cannot remember whose it is, I think it is Xcut.  Beautiful die, not sure whether it would take card but it was brill with paper.

I die cut my image using spellbinders postage stamp die and layered that onto a piece of lilac card which is square.  I used marianne dies for the flowers and stencilled them with distress inks.  I finished those off with some card candy.  My sentiment was a stamp from the Crafters Companion Inspiration Mag - the free stamps and die cut using an xcut die.

Hope you like it and thank you for stopping by.  Take care folks.

I will enter this card into the following challenge: -

Tuesday 16 April 2013

Vintage

Hello crafters and followers.  Isn't this year going quickly, middle of April already.

My post today has been designed for our latest subject on the craftateers blog and it is Vintage, why not pop along to check out what my fellow crafteers have come up with.

I began with a 15cm x 15cm base white card.  I had some vintage type paper in my crafty stash which actually was a freebie from a Cardmaking & Papercraft mag - just shows they do come in handy and it is about time I started using them instead of just putting them in my growing 'bit box'.
 
I cut my vintage paper slightly smaller than the card, and then cut a piece of antique gold pearlescent card the same size as the card.  I cut an aperture out with my spellbinders to make a frame and glued the vintage paper onto the back of the antique gold card and then placed the whole lot onto my base card.
 
I have used alot of my spellbinder dies to decorate my card so in order: -
 
  1. Morrocan motifs using some cream card.
  2. Medallions 3 d-lites using antique gold
    card.
  3. Blossom 5 in cream card and stamped the
    sentiment in versafine crimson red which I also clear embossed.
The flowers were all die cut using white card and then inked up with Victorian Velvet distress inks.  The dies I used was from Jewels Flowers & Flourishes set, as was the tiny butterfly.   All finished off with some card candi which has sweet little roses on.
 
Hopefully you will agree with me that this is vintagy.

Thank you for stopping by and for any comments you choose to leave.  Do take care.
 
I have entered this card into the following challenges: -

Saturday 13 April 2013

Medallion Six


Good afternoon everyone.  Hope you are all enjoying your weekend.

My post today is using another spellbinder d-lites - medallions six.  I stamped the back plate out 6 times and them stamped the whole thing out 6 times in some vellum which was a freebie in a Making Cards magazine.  I then secured the vellum to the back plate with a little glue and punched holes in the bottom before securing them all together with a brad I then just fanned them out.  My backing paper is also a freebie from the magazine which has been matted onto a C5 plain white base card.

I put some green burlap ribbon across the card and placed by medallions onto that with pinflair.  The flourishes and flower is from spellbinders flowers & flourishes set and the back lace flower is a Marianne die

This medallions six d-lite was one that I hadn't used before and to be honest wasn't sure how I was going to use it but watching all the d-lite programmes on C&C and listening to the talented Jo Channon she gave me the idea of a fan and I do think it works a treat.

Hope you like this one.  Thank you for popping by.  Take care.

I have entered this card in to the following challenges: -

Thursday 11 April 2013

Blue Pants


Hi fellow crafters and followers.  How are you tonight, good I hope.  Looks like the cold weather is finally on its way out and the warmer weather on its way in, trouble is that probably means rain - that's england for you.
My post today is using a digi stamp from Mo's Digital Pencil,  I printed her out onto water colour card, watercoloured her using whisper pens.  Another one I did whilst convalescening.  I then cut around her to position her onto the die cut from marianne. 

The card is a C5 base white card followed by another smaller piece of white card which I pricked around the edges in true Sue Wilson style.  I then cut a smaller piece of white card and embossed it using one of the embossilicious folders from Crafters Companion, before embossing I inked the folder using Tim Holtz distress inks and then distress around the edges to make the embossing pop.
 
The two flourishes were also a die which came with the lace die above - marianne.  The flowers are also marianne and I stencilled them using Tim Holtz distress inks - mustard seeds.  All finished off with some card candi.
 
Hope you like it.  Thank you so much for stopping by and for your comments.  Take care.

Sunday 7 April 2013

Best Wishes with Attitude!

 
Hi folks, hope you are well today.
 
My card today is a super digi stamp from Saturated Canary. I do so love this little lady, I think she definitely shows serious attitude!
 
I started with a C5 white base card followed by some light blue card and then some patterned paper from my crafty stash.  I used some of the same blue card and die cut with a spellbinders from the 5x7 matting basics which I also ran through a dotty embossing folder.
 
My image is a digi stamp printed onto water colour card and then watercoloured with whisper pens.  This was one of the images I coloured during my convalescence.  It took me three nights because I could only do about 15 minutes at a time and then rest for an hour because of the repetitve strain on my shoulder.  She was such a delight to colour I really didn't mind and thoroughly enjoyed colouring her.
I then die cut the image with my 5x7 matting basics and also die cut some of the blue card with the next size up. 
 
These spellbinders 5x7 matting basics A and B are definitely worth the money.  At first I was hesitent I have to admit because they are expensive and I thought, I can cut boxes no problem but then I listened to this 'building on the core' and noticed that my matting was  not always as straight as it should be, now they all mat beautifully - a definite investment.
 
My flourishes are marianne dies which I cut twice in white and pink causing a shadow which I do like doing and love the effect.  My embellishment was cut using a sizzix rosette.  There are other ways of achieving the same result but using this sizzix rosette cutting die is an easy way.  The final touch was a little sentiment.
 
I do hope you like this and thank you for stopping by and I soooooooooooooo appreciate your comments.  Until next time - take care.
 
I have entered this card into the following challenges:-


Friday 5 April 2013

Golden Butterfly

Good afternoon crafters and followersI do hope you are having a better day than me, it would appear my email account was hacked - gosh was I shocked.  Luckily BT picked it up and I had to change my password - not good as I am terrible for remembering passwords.  Then I had to go for an x-ray this morning which I was soooooooooo not looking forward to.  Apparently it was a drop in type between 11 & 4. So I went prepared - no metal on my clothing, any clothing.  They still made me get totally undressed, sit in one of those awful gowns that give you no dignity at all only to find that there was no need to get me all undressed at all just the lower half - leggings and shoes.  Honestly, I felt like a piece of meat on a slab.  The good news - I was in and out in 30 minutes - how shocked was I.  The x-ray nurse was lovely though so not too bad.  Now I have had my rant and bored you all silly - sorry - onto my card for today.

I began with my base white C5 card followed by another piece of base white card which I pricked in 'Sue Wilson' style. I then stamped and embossed a piece of black card with a lovely swirl from a stamp set called Butterfly Flourish Swirls from Chocolate Barouque with gold embossing powder.  I then stamped the butterfly image from the same stamp set onto some cream card and used guilding flakes from IndigoBlu - Lancashire Rose.  I then die cut that out with my spellies.

My flowers and leaves are all dies from Marianne and those have been finished off with some pearls.

Hope you like this.  Thank you for stopping by and for any comments you choose to leave.  Do take care, see you next time.

I have entered this card into the following challenge:-


Tuesday 2 April 2013

Future Dreams

Hi folks, hope you are all well.

My post today was me playing around with spellbinders.  I have been mooching through Sue Wilsons blog for ideas, picked a layout and worked with it/adapted it.

This is a white C5 card followed by another piece of small card which I pricked around the edges, time consuming but I do so love the effect, definitely 'pinched' from Sue - hope you don't mind Sue? 

I then used some backing paper which was a freebie in one of the magazines - Card Making and Papercraft Mazazine' - I bought on the 21st March which had one of Jayne Nesterenkos stamps as another freebie.  I also embossed the paper.

The sentiment was from a set by Inkylicious which I stamped with black versafine ink and clear embossed.  This is surrounded by a frame die cut from spellinders labels and the back one has lemon ribbon wound through.  The swirls were die cut using a sizzix die, cut twice in blue and white to shadow.  The flowers were die cut using marianne dies and then stamped and embossing with yellow/gold embossing powder finished off with pearls.

Hope you like this, thank you for stopping by and for your comments.  Take care, until next time.

I have entered this card into the following challenges: -

Monday 1 April 2013

Medallions Four

Hello folks. Easter Monday, public holiday - yippee.  Hope you are enjoying yours.

My card today is another one using my d-lites spellbinders.  Again I have used a C5 base white card but this time I have also used another piece of white card, pricked around the edges in true Sue Wilson style and then embossed it using the Turkish Delights embossing folder, I have used the debossed side this time.

Using some bits of card from my bit box I have then die cut 2 completed medallions 4 and 1 backing from medallions 4. I embossed a line down each section, folder each section which then gave me this 'flower' look.  The middle section was another die flower form Marianne dies and then using my versafine pen I put some wow embossing powder on to the middle.

I die cut two lots of flourish 1 and die the cut the smallest from the A2 Floral Ribbon Threader.  I drew around the middle of the floral ribbon threader, cut that our and stamped my sentiment and embossed that in wow embossing powder.

Hope you like this.  Thank you for stopping by.  Take care.